Garden Illumination with WiFi RGB spots and Loxone
integrating super cheap WiFi RGB LED Spots from Novostella into our Loxone Smart Home

Unfortunately, our non-smart garden illumination was defective, so I started the search for a replacement that could ideally be fully integrated into our home automation system. I found a lighting system that was not intended to be integrated into our home automation system, but it can be perfectly integrated with a few tricks and is also much cheaper than any competing system I have found so far.
Features
What requirements did I have for our future garden lighting? I wanted to place several spots in our small garden, which would illuminate several parts of our garden (e.g. trees and bushes) from the bottom. Besides warm white light, I also wanted to have the possibility to set colored light accents. Since I only have a power cable in the garden but no data cable, the spots themselves should have a certain intelligence and should be controlled by our Smarthome System Loxone via WiFi without further components.
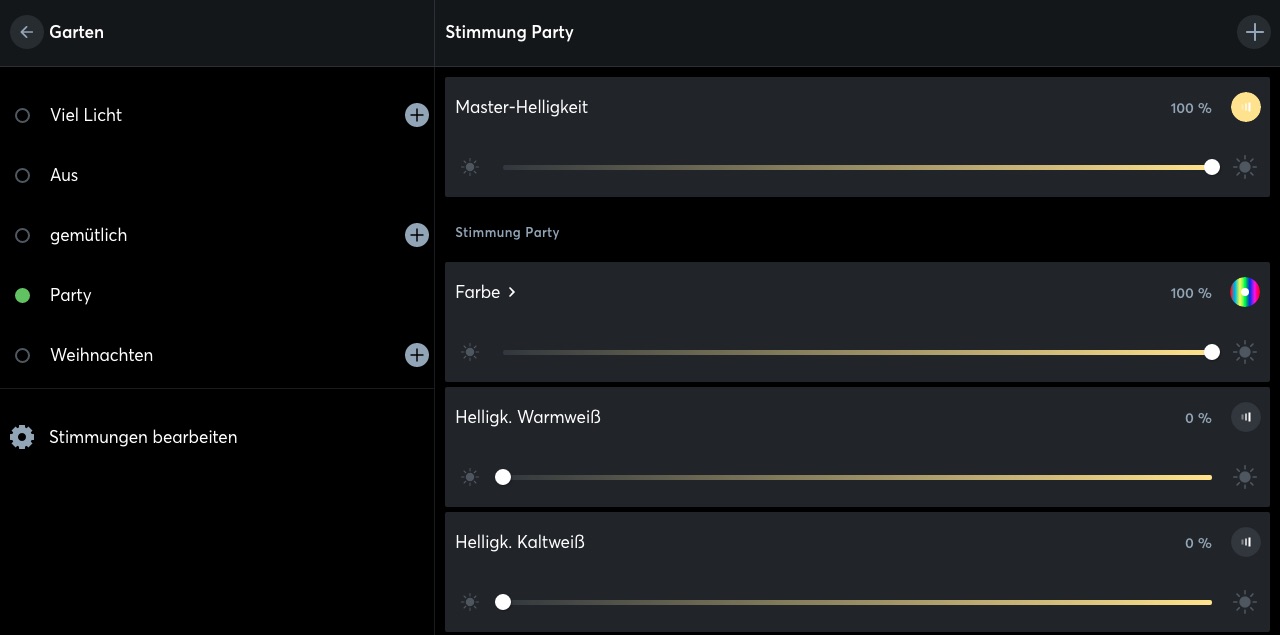
Loxone lighting moods
The screenshots from the Loxone App and Config Software are currently in German. If you would like to read these screenshots on this blog in English, please write me a comment below.
Components
What do you need to implement a cost-effective smart garden lighting?
-
Loxone Miniserver Go
First of all, you need a Smart Home Center, which controls your complete home automation. I rely on Loxone and thereby run the Miniserver Go from Loxone. It is cheaper than the conventional Miniserver and is very easy to connect, especially for additional installations that are not supposed to be installed in the electrical cabinet (you only need an electrical outlet and a connection to your network). -
Novostella WiFi RGB LED Lights
Then of course the garden spots themselves are needed. Here I use the Novostella WiFi RGB LED. You can also use other products but the WiFi LEDs must contain a chip that can be used to flash different firmware. More about this in a second.
Novostella RGB WiFi Spot
- Raspberry Pi for flashing Novostella LED Devices with Tasmota Firmware
To make the spots work with Loxone and not with the standard app from Novostella, they have to be flashed with different firmware. I use the open-source image TASMOTA. To flash this image to the spots you need a Raspberry Pi (incl. power supply, WiFi and an SD card).
Cost Comparison
As you might have noticed this post is quite long and even though I tried to explain the implementation in a simple way you still have some steps ahead from here. So the question comes up if the effort of this inexpensive solution is worth it or if you should go for a ready to use product.
Let’s take a look at the world of Loxone and it turns out that there are no ready to use spots that can be installed and controlled outdoors. But Philipps, the market leader, has outdoor spots with its Hue System, which can also be controlled via a Loxone gateway. This is not really Plug & Play either and the following cost overview shows that the Hue Systems are not worth the money compared to the spots I use (at least concerning the functionality. There is nothing I can say about qualitative differences between the products).
The following cost overview shows the total costs for the realization of an RGB LED outdoor lighting system by Philipps Hue and the Novostella spots:
Philipps Hue
| component | price | shop |
|---|---|---|
| Philips Hue White & Col. Amb. Lily XL 1 flg. Spot | 116,90 € | https://amzn.to/3jYFv4d |
| Philips Hue Outdoor 40W DE+at Niedervolt Netzteil | 35,94 € | https://amzn.to/2ZitRZT |
| Philips Hue Bridge | 44,83 € | https://amzn.to/328pna4 |
| Total | 197,67 € |
Novostella
| component | price | shop |
|---|---|---|
| Novostella WLAN RGB LED Lights | 75,99 € | https://amzn.to/2ZguD9K |
The price difference of 197,67 € to 75,99 € becomes even more significant when you consider that the Philipps system offers only one spot, but the Novostella system offers two spots.
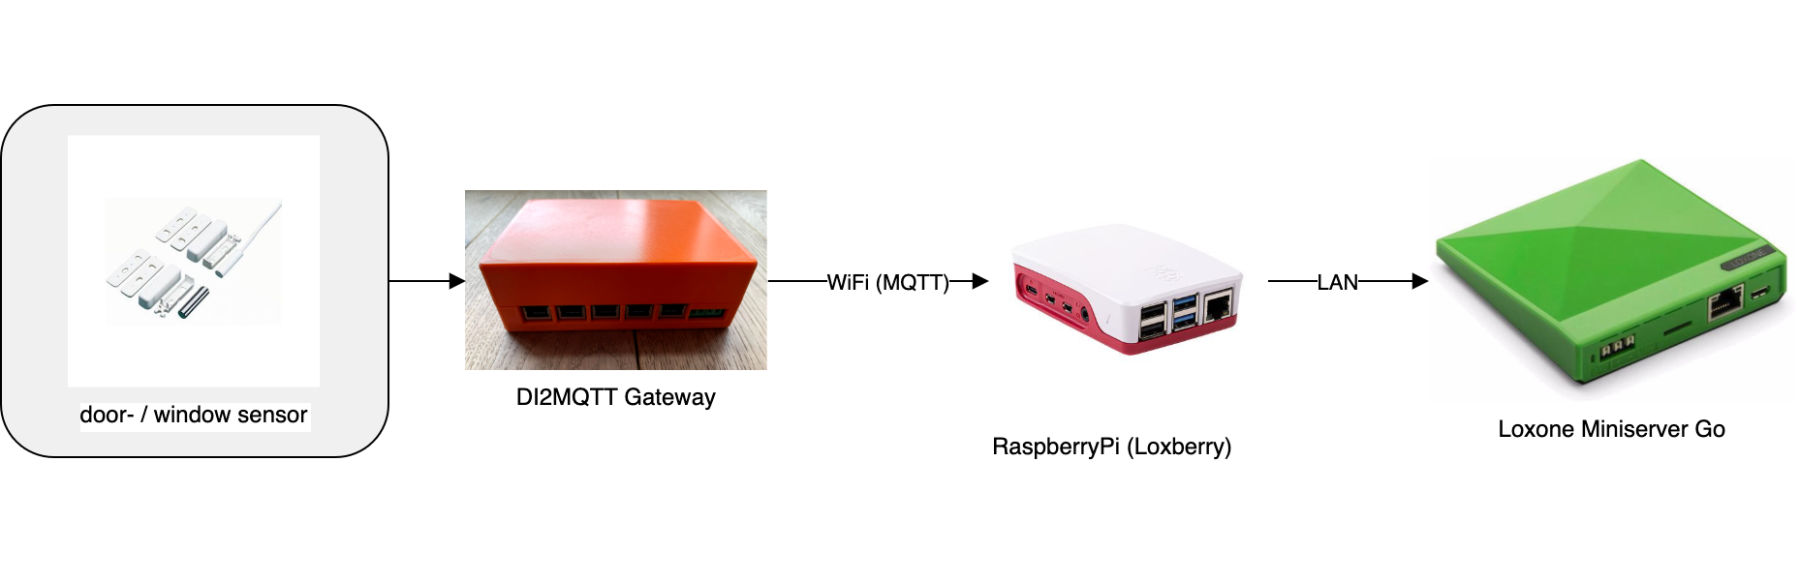
Architecture
What does the system architecture for the connection of the Novostella spots to the Loxone system look like? As you can see in the following picture it is very simple. The spots communicate directly via WiFi with the Miniserver. No additional gateway (Raspberry Pi or similar) is required. If you wish to use several spots, they can all be controlled individually and independently from within Loxone. For simplification, I control my four garden spots via one output in Loxone.
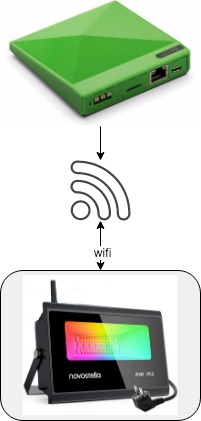
Architecture
Implementation
To be able to control the WiFi spots with Loxone we will first modify the firmware and install the open-source firmware Tasmota. For this, we use a security issue which has been reported During a talk at the 35th Chaos Communication Congress (35C3). After that, we will configure Tasmota to control the spots with Loxone via an HTTP request. The last step is the implementation within the Loxone Config to select colors and brightness as user-friendly as possible.
1. Flash WiFi Spots
Follow the detailed instruction on this page or do the following steps (Without detailed explanation)
- download raspbian imager: https://www.raspberrypi.org/downloads/
- choose Raspberry PI OS LITE (32 bit) and create sd card
- Enable SSH by placing a file named
ssh, without any extension, onto the boot partition of the SD card - place SD card into raspberry PI, connect it with your ethernet and power it up
- check the PI´s IP adress with the help of your router
- log in to the terminal (click here for more details):
ssh pi@<IP>
Password:raspberry sudo apt-get updatesudo apt-get upgradesudo apt-get install git- activate WiFi on raspberry:
sudo rfkill unblock 0 git clone https://github.com/ct-Open-Source/tuya-convertcd tuya-convert- Prepare flashing:
sudo ./install_prereq.shand confirm the next step by enteringyes - optional: terminate dnsmask and mosquitto by answering
yestwo times - start flashing:
sudo ./start_flash.sh - connect any WiFi device (f.e. your smartphone) with the raspberry (otherwise the flashing script will not start)
- Set LED to smartconfig mode by turn on-off-on-off-on the LED. rapid blinking (0.5s per blink) indicates the correct status
- press
ENTERto start flashing process
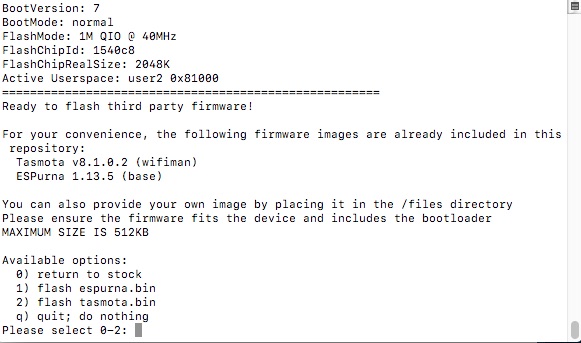
ready to flash firmware
- select
2to flash tasmota firmware and confirm withy

successfully flashed tasmota
Done! That´s it for the first step. Your WiFi Spots are successfully flashed with Tasmota firmware. In the next step we are going to configure Tasmota to work correctly within our WiFi Network and to control the Spots with the correct parameters.
2. Configure WiFi Spots
- connect with Tasmota Hotspot named
tasmota-xxx - Enter your WiFi credentials in the Captive Portal
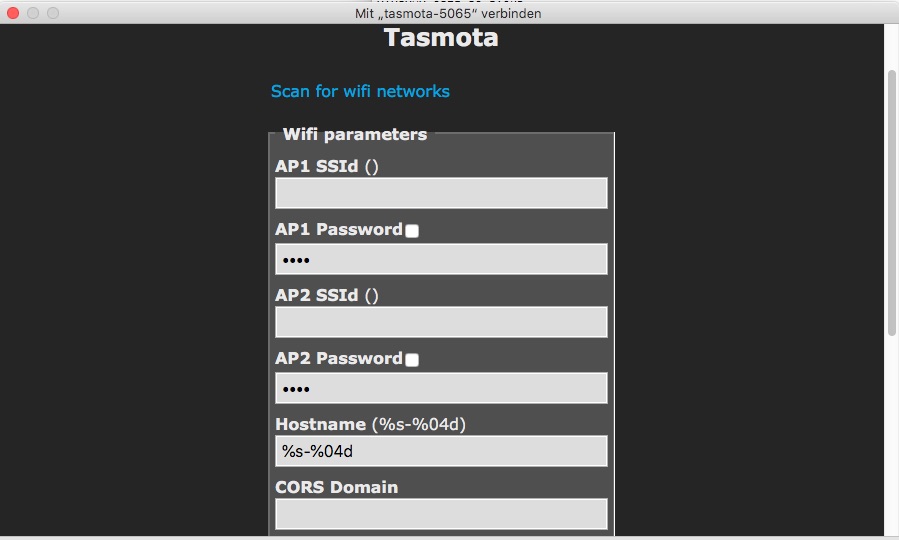
Tasmota Captive Portal
- Reconnect to your home network and make sure in your router settings that the newly added WiFi Spot gets a static IP address
- Open the static IP address set in your router in your browser to configure the new firmware (Tasmota) of your WiFi Spot
- optional: update Tasmota Firmware
- select
Configuration / Configure Templateand create a new template with the parameters shown in the picture below:
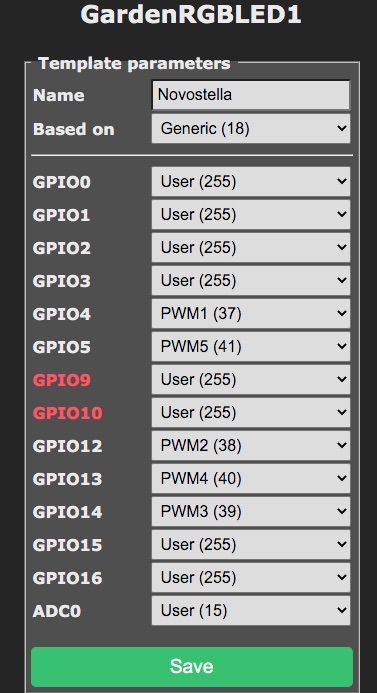
Tasmota Template Configuration
- select
Configuration / Configure Moduleand select the template from the previously created step (in this example Novostella)

Test WiFi Spots in Tasmota
That´s it for the configuration of the WiFi Spots in the Tasmota Webinterface. You can test the functionality (brightness, colour, temperature) with the help of the tasmota Webinterface. If everything works you can go on to the last step: The configuration in the loxone config software.
3. Configure Loxone
The configuration of controlling the WiFi spots in Loxone is not difficult. To be able to configure the commands for the different color and brightness values correctly, however, several blocks are needed, which I will briefly introduce in the following. You will find an overview of the complete configuration in the following picture:
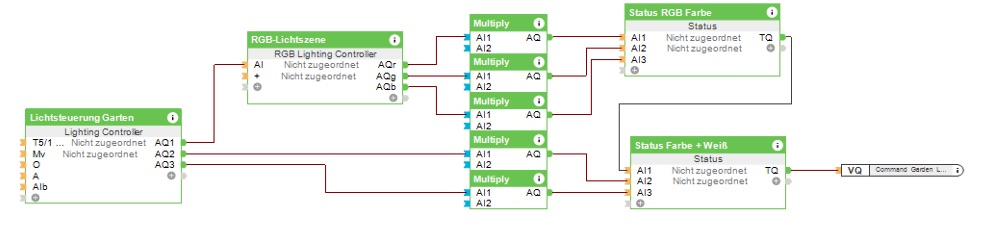
Loxone Config - Overview
- In the Lighting Controller three outputs are set up to control the WiFi spots:
- RGB (for brightness and color tone of the colored LEDs)
- Dimmer warm white (for the brightness of the warm white LEDs)
- Dimmer cold white (for the brightness of the cold white LEDs)
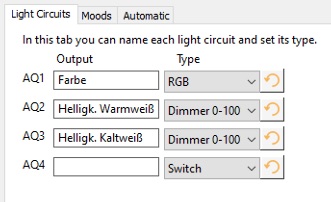
Loxone Config - Light Circuits Output
-
To convert each RGB channel individually, an RGB Lightning Controller is used to split the RGB channel output.
-
Then the three color values and the two white values are multiplied by a factor of 25.5. Thus, at maximum brightness, 100 becomes 255.
-
The two status modules are used to merge the converted brightness values back into one statement.
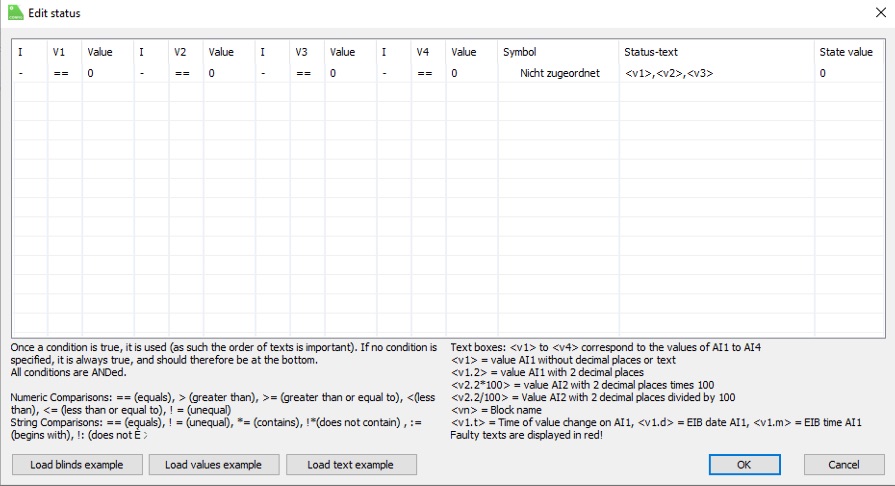
Loxone Config - Status Devices
- The completed command only remains to be sent to our WiFi spots via a virtual output command. To do so, we create a virtual outlet and set the static IP address of the WiFi spots.
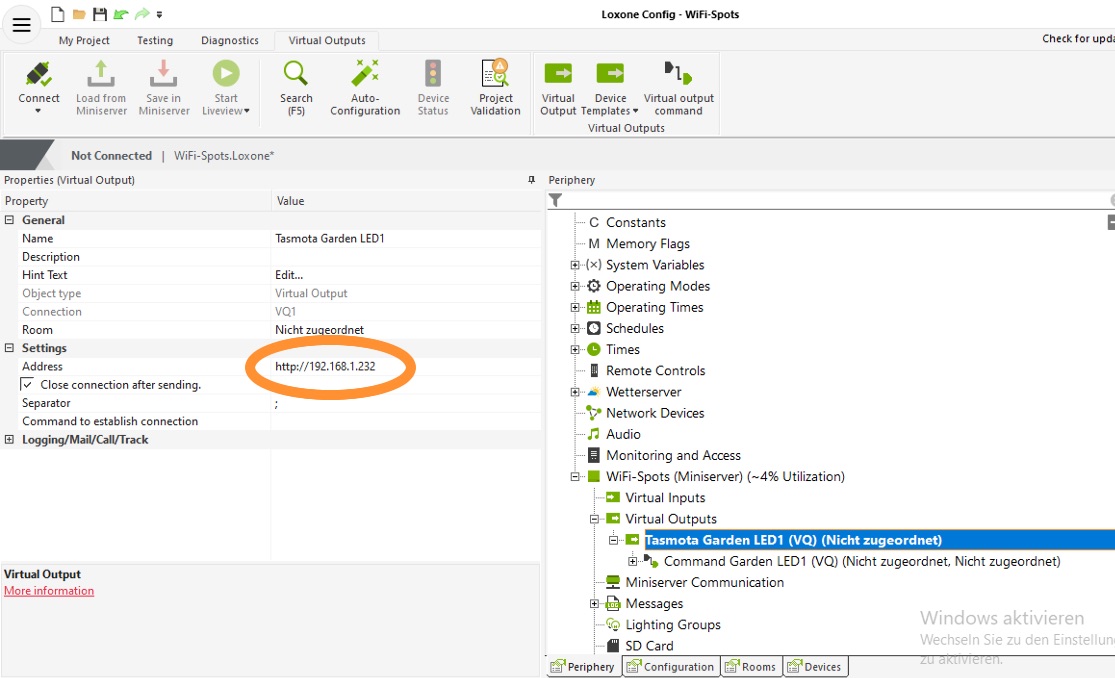
Loxone Config - Configure Virtual Output
- The last step consists of setting the command in the virtual output with the correct syntax. Make sure that the virtual output is defined as an analog output.
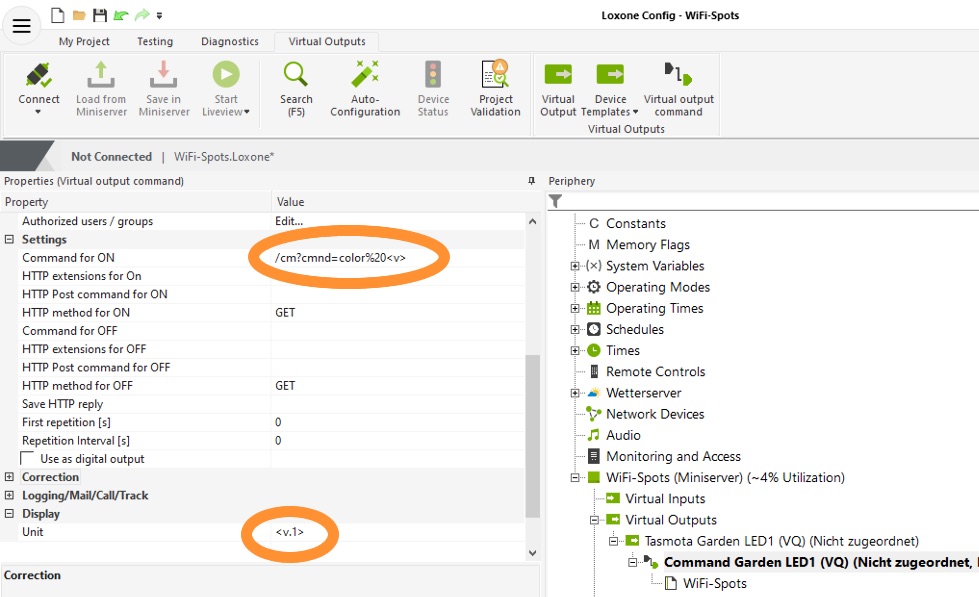
Loxone Config - Configure Virtual Output Command
- Done!
You have completed all necessary steps to control the WiFi spots in brightness and color from the Loxone app. To make the individual steps in the Loxone configuration more understandable, I prepared a sample file for you to download: download loxone example project
Summary & Forecast
In this blog post, I have demonstrated how to integrate colored WiFi spots into the Loxone system with very low costs. By flashing an alternative firmware to the WiFi spots it is possible to control the spots directly out of Loxone and to set color and brightness.
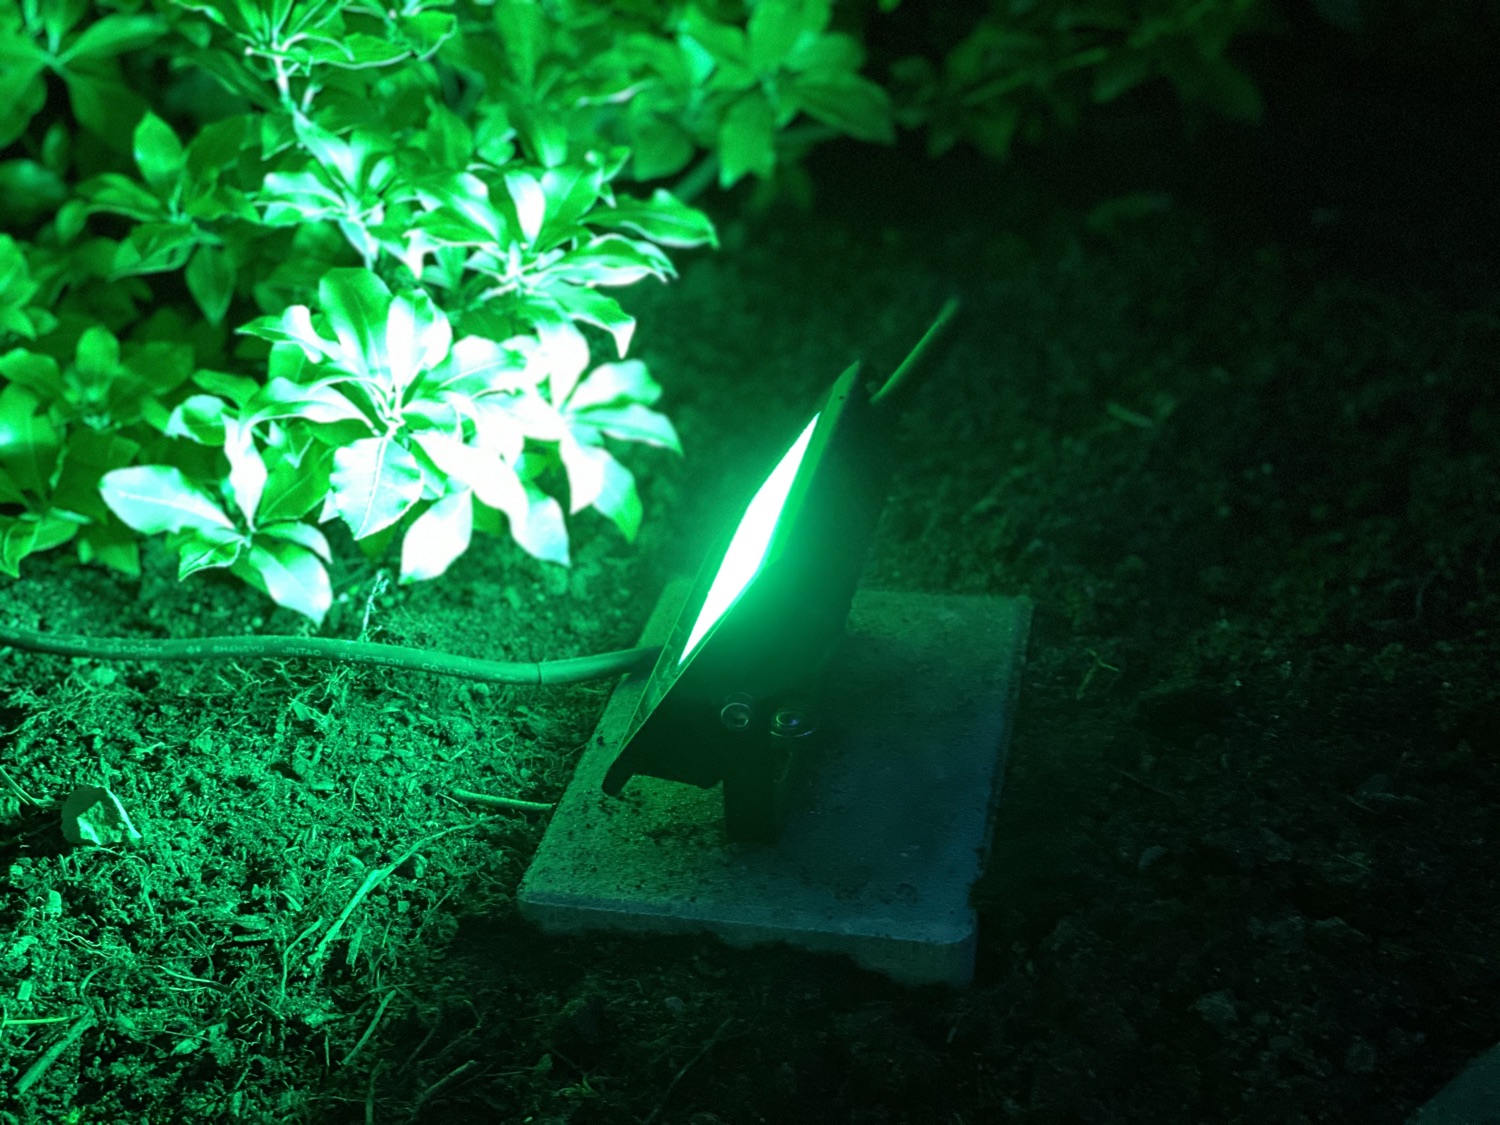
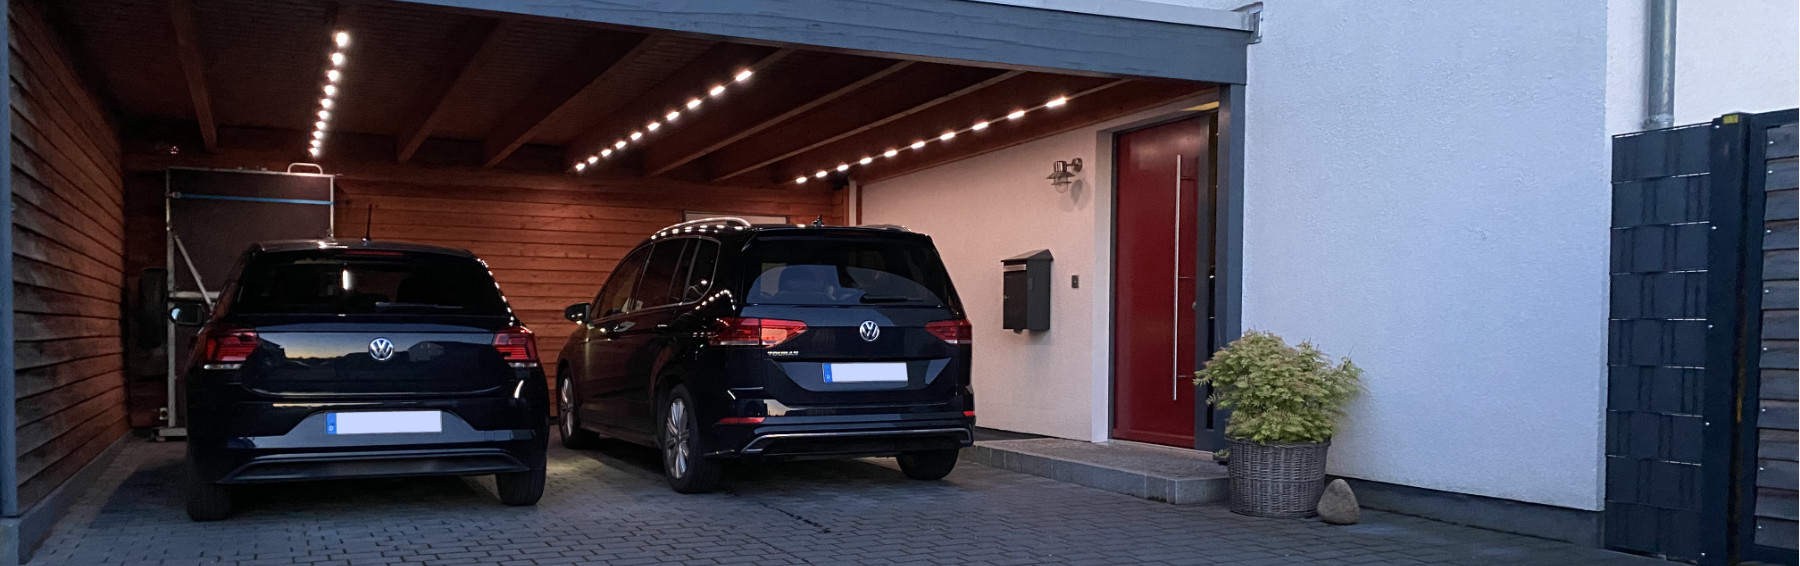
I am very satisfied with this practical use of this solution and I enjoy the cozy warm white light in our garden every evening. At Christmas time, the lighting mood “Christmas” sets our garden in a beautiful red ;-)
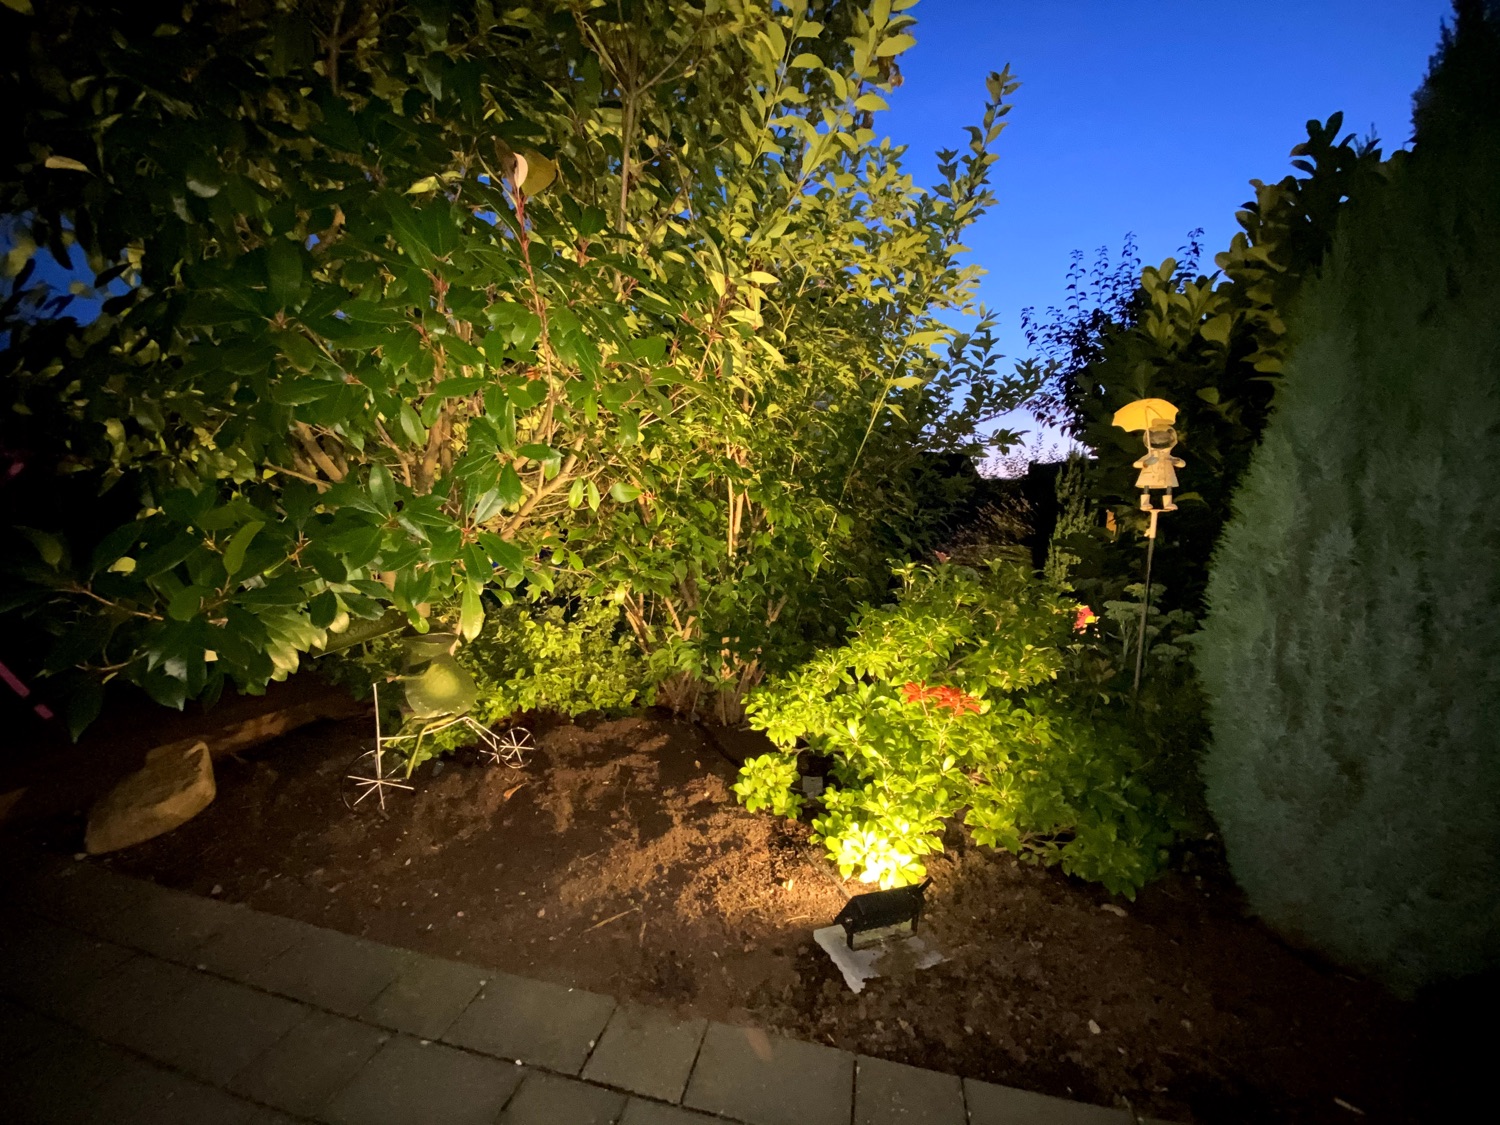
illuminated garden controlled with Loxone
What do you think about this example of my smart garden illumination shown here? Is the immense cost reduction worth the small effort of configuration or do you prefer to buy the more expensive finished products?


Andre Braun