Ultimate Smart Home Shutter Control
Budget-friendly, robust, feature-rich, and future proof automation of our shutters
Down when it’s dark, up when it’s bright - what’s so difficult about automated shutter control? That were my first thoughts when I started to program our shutters in the house. But when does it exactly get dark? And how do I deal with the shift of that time during the year? Can I also use the blinds as heat protection during the day in the summer? And how do I prevent a closed shutter of the living room window from locking me out on the terrace in the summer?
These questions had to be answered before I could start programming our shutter control. I quickly realized that automatic shutters are the ultimate discipline in the smart home because it is not so easy to map personal operating behavior into logic. And a wrong logic is much more annoying with shutters than, for example, with lighting. For example, it is very annoying if you want to sleep for longer on the weekend, but the blinds in the bedroom are raised early in the morning.
Features
- In case of fire alarm, raise shutters to provide escape routes.
- In the event of a storm, raise the shutters to protect them against damage.
- In case of very low temperatures and snowfall, do not move shutters to protect them against damage.
- If it is bright outside and nobody is home, move all shutters up.
- If it is bright outside but residents are home, then do not raise all shutters all the way, but set them to a screen position.
- When it gets dark outside lower the shutters.
- If it gets hot today, move the external shutters to a heat protection position to keep the room temperature low.
- If a door is open then do not lower the shutters to prevent occupants from being locked out.
- To prevent burglary, raise and lower the shutters as if occupants were present when they are not at home. Raise the shutters in brightness to wake the children if they sleep too long.
Planning Principles
Implementing our shading control system, the following principles were fundamental to me:
- cloud free
- robust
- affordable
- retrofittable
- operable even if Smart Home system breaks down
Components
What do you need to implement the ultimate Smart Home shutter control?
-
Loxone Miniserver Go
First of all, you need a Smart Home Center, which controls your complete home automation. I rely on Loxone and thereby run the Miniserver Go from Loxone. It is cheaper than the conventional Miniserver and is very easy to connect, especially for additional installations that are not supposed to be installed in the electrical cabinet (you only need an electrical outlet and a connection to your network). -
SHELLY 2.5
In addition to the Smart Home control panel, we also need a smart actuator for each automated shutter. This actuator implements both the switching commands of the miniserver and the manual operation of a connected switch. I use the Shelly 2.5 for this task, which can be installed behind the shutter switch in a deep junction box.
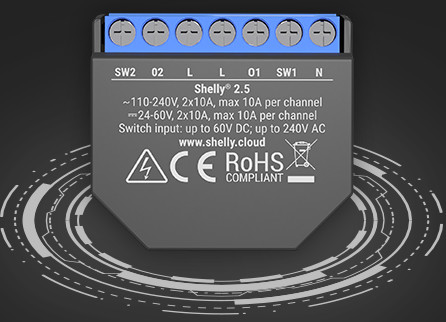
Shelly 2.5
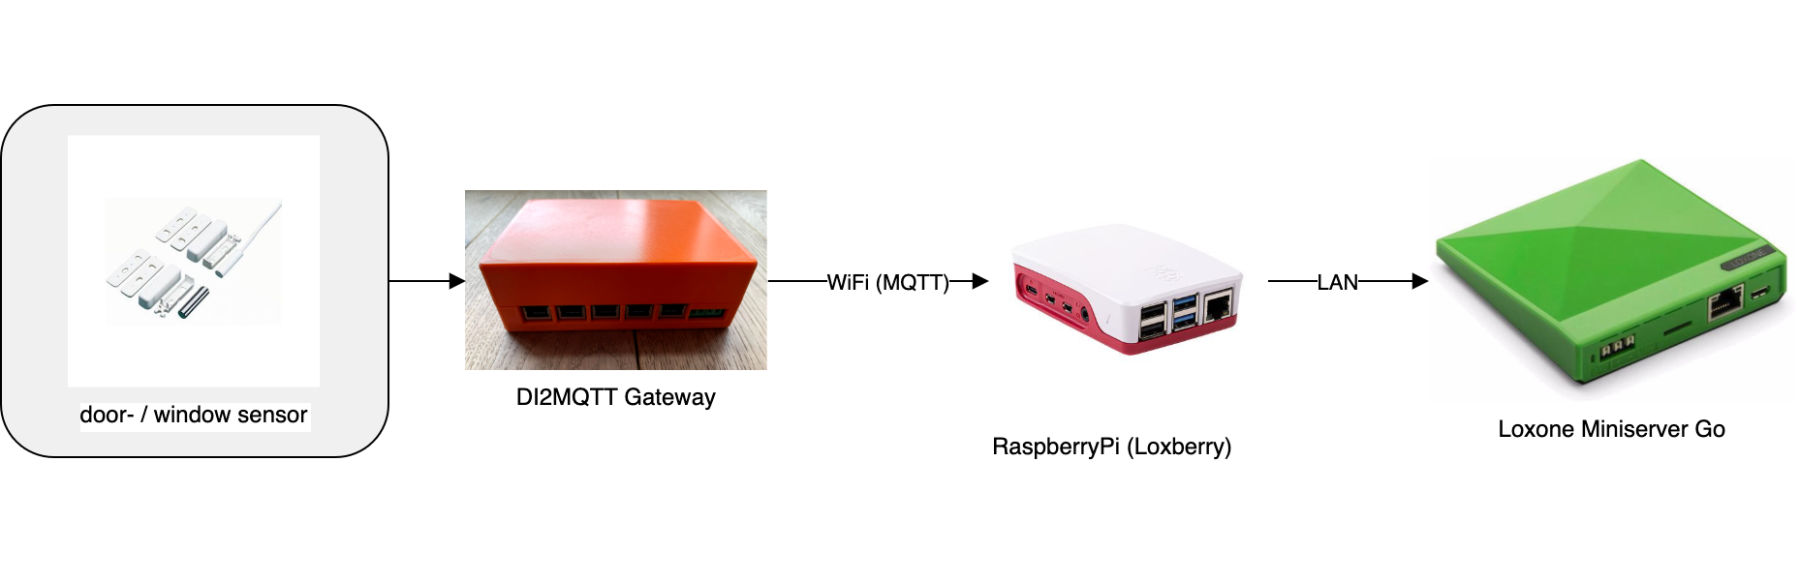
- Raspberry Pi
In order to track manual operation of the roller shutters in the Loxone Miniserver, the Shelly actuators send their current status (button pressed, motor start, motor stop) via MQTT protocol. A Raspberry Pi (incl. power supply, WiFi and an SD card) with Loxberry image is used to send MQTT messages to Loxone. The Raspberry Pi provides a MQTT broker and sends the Shelly messages to the Loxone Miniserver.
Cost comparison
If you leave out the Miniserver Go and Raspberry Pi in the cost analysis of my ultimate shutter control, then only costs for the Shelly 2.5 of approximately 20€ are required for each automated shutter. That is 160€ for 8 automated roller shutters in our house. An 8-port KNX shutter actuator is quickly twice as expensive. Besides, there are additional cables for the cabling from the meter cabinet to the shutter.
Price comparison with a plain Loxone installation or a KNX installation is nevertheless difficult. The channel Hausautomatisierung.com published a very interesting comparison for complete home automation with Loxone, KNX and Homematic components on YouTube.
The advantage of my ultimate shutter control, in addition to the lower price, is the very easy upgradeability of old buildings, or if during the construction phase of the new building the budget for the automation of all shutters was too small.
Realization
In this section, I describe the realization of my ultimate Shutter Control. First I will explain the architecture, which means the interaction of the individual components. Then I describe the most important settings in the Shelly and Loxone configuration. Since there are already excellent tutorials for the individual parts, I will not explain each step in detail here. If despite the linked tutorials something is not explained clearly, then I’m happy about your comment below.
Architecture
Before describing the configuration of the Shelly actuators and the Loxone configuration, I will explain the concept of connecting the world of Shelly and Loxone. I distinguish between automatic control of the shutters by Loxone and manual control via buttons connected to the Shelly. In this context, I will skip the electrical wiring of the Shelly actuators. This information can be found in the manual of the Shellys.
I will also not go into more detail about the configuration of the MQTT broker on the Raspberry Pi. That would go beyond the length of this article. Just have a look at the help pages for the MQTT plugin in the Loxberry Wiki.
Automatic control via Loxone
To control the roller shutters via Loxone, an HTTP command is sent from the Miniserver to the Shelly actuators via WiFi. This command is generated by Loxone depending on the outputs of the Loxone shutter module.
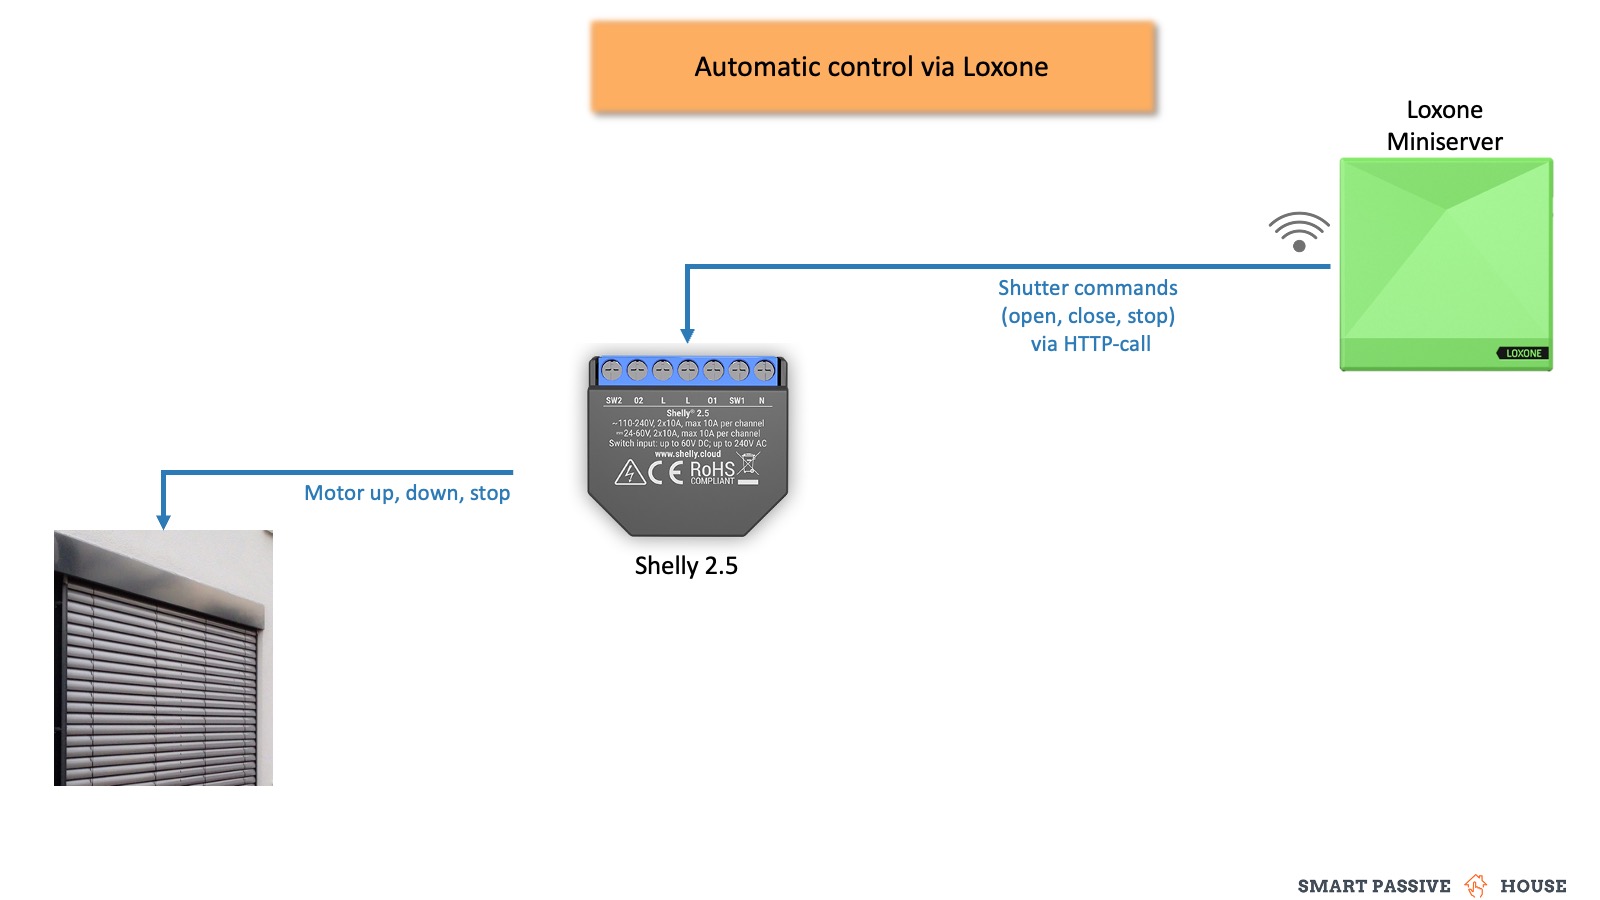
Shutter Control via Loxone
Manual operation via pushbutton switch
Manual control of the roller shutters via a connected pushbutton can be realized in two different ways:
- Manual operation logic via the Shelly actuator
With option 1, the Shelly actuator directly controls the shutter motor when a pushbutton signal is received. This offers the advantage that option 1 work even if the Miniserver is down. Besides, the motor is controlled without delay after pressing the button. Problematic with option 1 is that the Miniserver must be informed about the manual operation of the roller shutters to display the status of the roller shutters correctly in the Loxone App. This requires a more complex logic in the configuration software.
- Manual operation logic via the Loxone Miniserver
With option 2 the push button signal is not directly forwarded to the shutter motor but the signal logic and the motor control are separated from each other. The push-button signal is sent to the Loxone Miniserver and from there it is sent back to the Shelly actuator via HTTP command. The advantage is that the Miniserver always knows the current position of the shutters because the Miniserver controls the shutters exclusively. A disadvantage is the dependency of all shutters on a working Miniserver and the slight time delay between button operation and actuator control.
Since I often want to be able to manually control the slats of my external venetian blinds only briefly by pushbutton and a fail-safe solution was very important to me, I went with option 1.
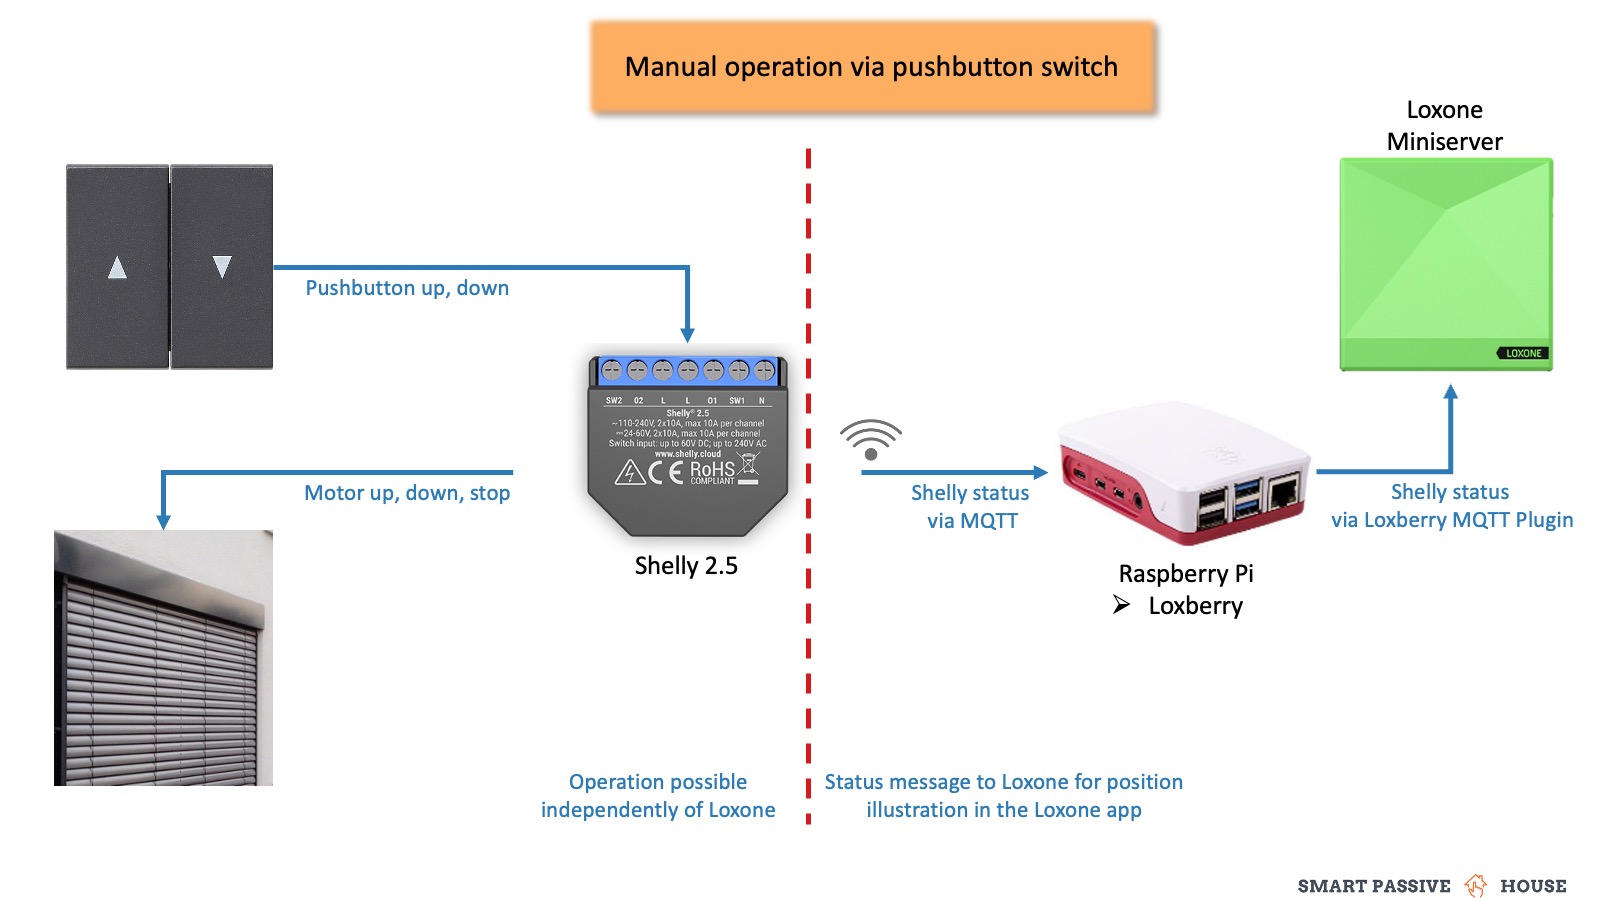
Shutter Control - manual operation
Configure Shelly
Besides the basic configuration of Shelly actuators (WiFi setup, firmware update), the following settings are important for the ultimate shutter control:
- DEVICE TYPE:
Roller Shutter - POWER ON PARAMETERS:
STOP - OPEN/CLOSE WORKING TIME: significantly longer than the shutter actually travels (set to ‘100 seconds’ in my case)
- INPUT BUTTONS MODE: depending on the connected button. I have two buttons connected (up, down) and therefore set to
Open & Close Buttons. - BUTTON TYPE: also depending on the connected button. With me:
Toggle - POSITIONING CONTROLS:
enable&calibrate - In the ADVANCED - DEVELOPER SETTINGS enable MQTT and paste the credentials of your MQTT Broker. I am using the MQTT Broker from my Loxberry.
Configure Loxone
The base of the Loxone Configuration consists of the Loxone Shutter Module. The Shelly actuators are controlled via an HTTP command, which is composed of the outputs of the shutter module. Following I will not explain all details of the programming in detail, because there are already excellent tutorials for the individual steps. Partly in German, but with an automatic translation function English speaking readers should hopefully also be able to follow the steps.
To detect a manual operation via push button, the status of the Shelly actuators is required in Loxone. This status is transferred to Loxone via MQTT with the help of a Loxberry plugin (the Raspberry Pi is required for this). Refer to the following tutorial for more details: Shelly to Loxone via MQTT Tutorial
Core of the Ultimate Shutter Control in the Loxone configuration is the Loxone shutter module. Unfortunately, some additional modules are necessary to recognize a manual operation and to simulate the status of the shutters within Loxone. Refer to the screenshot below. For understanding I have created a small example configuration, which you can donwload here: download loxone example project.
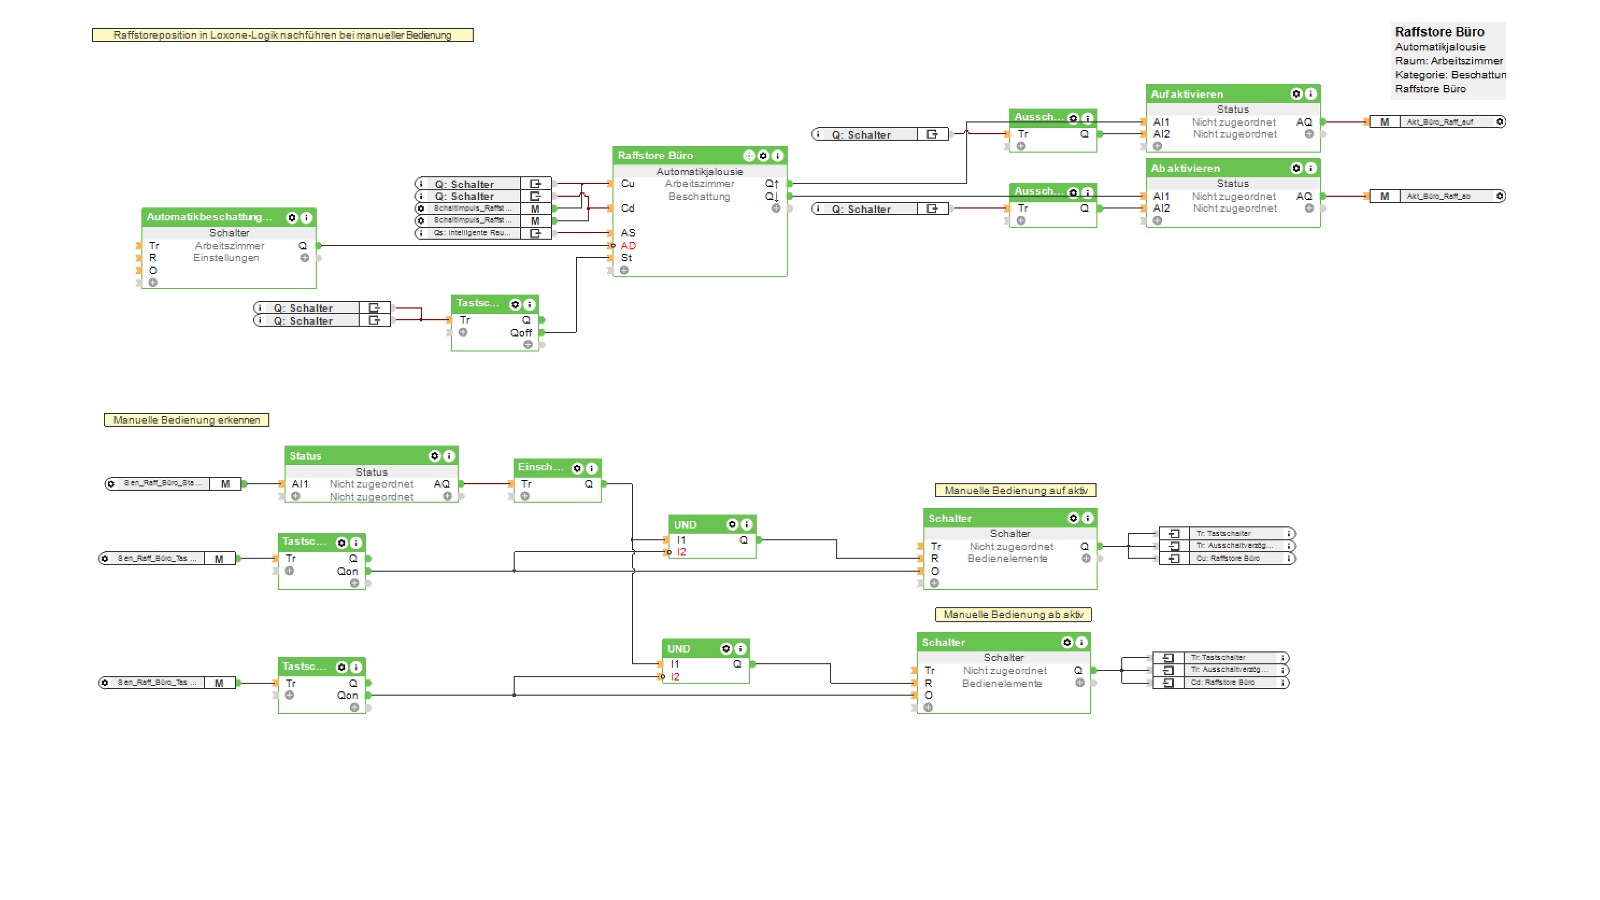
Shutter Control - Loxone Configuration
If you do not need the manual operation of the Shelly actuators, then only the shutter module and a HTTP command is required within the Loxone configuration. Sending HTTP commands to the Shelly actuators is explained very well in the following tutorial: Loxone to Shelly via HTTP Tutorial
Summary and Forecast
In this blog post, I have presented my very individual Ultimate Shutter Control. This also includes some special features like connecting to the fire alarm system to create escape routes in case of fire. Another feature is sun position-dependent shading to cool down the house in summer.
My Ultimate Shutter Control can be used in new buildings as well as for upgrading and is more cost-effective than other smart home systems. At the same time, it does not require a Cloud connection and is extremely fail-safe due to the manual operation feature. The emulation of manual operation in Loxone is a bit difficult, but the effort is worth it in my opinion.
My shutter control has not reached the final stage yet either. In the future, I will be controlling my logic depending on the occupants' presence status. Besides, I will use the temperature sensors of the Shellys to feed the fire alarm system of Loxone.